A couple of my errors in my daily games against XG have been deciding whether to clear the six-point or to take two off when bearing in against an ace-point game, so I decided to investigate the issue. Many factors will influence the decision:
- a) Whether gammons count
- b) Whether the opponent is more likely to crash if we keep a five-prime
- c) If gammons count, how many crossovers the opponent has
- d) What our distribution is like if we take two off
Try the eight positions without looking at the solutions and then see how you scored.
(1) 0-0 in a 5-point match. Blue to play 3-2

(2) 0-0 in a 5-point match. Blue to play 3-2

(3) DMP. Blue to play 3-2

(4) DMP. Blue to play 3-2

(5) Black leads 3-1 in a 5-point match. Blue to play 3-2

(6) Blue leads 3-1 in a 5-point match. Blue to play 3-2
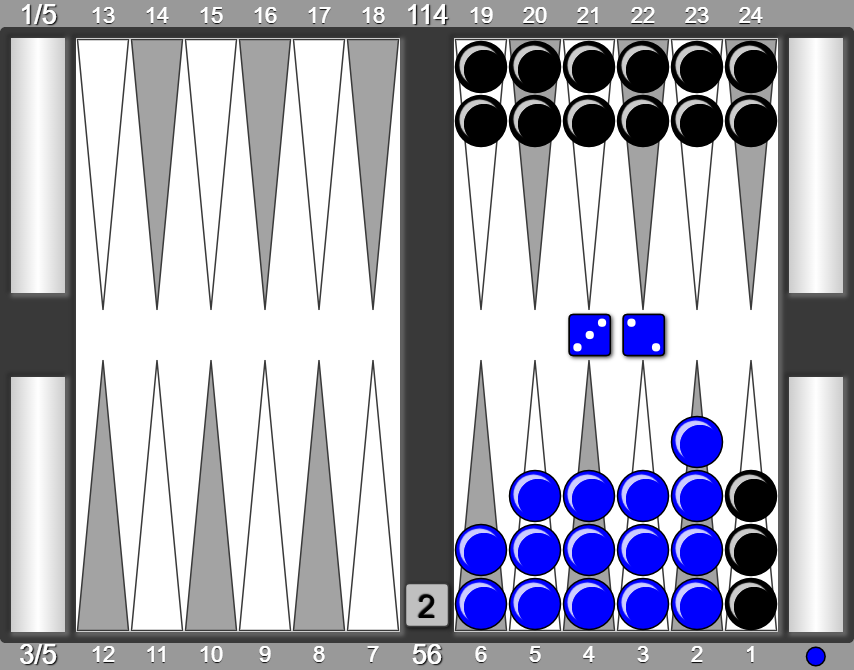
(7) Money game. Blue to play 3-2

(8) Money game. Blue to play 3-2
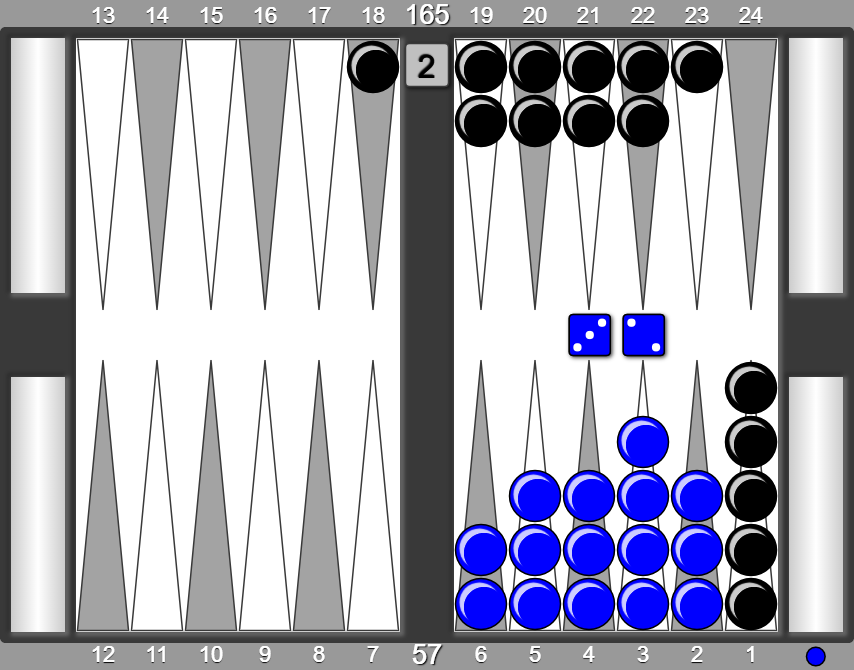
(9) Money game. Blue to play 3-2

And: What are the chances of Blue losing a backgammon with correct play, and why cannot Blue lose a backgammon in any of the previous eight positions?
Solutions
The decision I got wrong was the following:
(1) 0-0 in a 5-point match. Blue to play 3-2
I thought the gammon was very useful. Taking me to Crawford and Black has 12, mostly long, crossovers to my 15 to save it. I also thought Black might well crash if I kept the 5-prime. I would certainly have cleared the six-point at DMP, but thought the risk was worth it here. I was wrong.
| 1. Rollout Player: Opponent: | 6/4 6/3 87.06% (G: 32.47% B: 2.56%) 12.94% (G: 0.00% B: 0.00%) | +1.129 |
| 2. Rollout Player: Opponent: | 3/Off 2/Off 82.90% (G: 37.99% B: 3.86%) 17.10% (G: 0.00% B: 0.00%) | +1.108 (-0.021) |
| 3. Rollout Player: Opponent: | 5/Off 82.00% (G: 33.46% B: 2.94%) 18.00% (G: 0.00% B: 0.00%) | +1.022 (-0.107) |
So, it is an error not to clear the six-point. Let us make a small change to the position:
(2) 0-0 in a 5-point match. Blue to play 3-2
You have to peer closely to spot the difference between the two positions but the slightly better distribution swings it in favour of taking two off. Now it is an error to make the safe play, I say safe, but it only wins about 2% more games, just enough to make clearing the six-point right at DMP.
| 1. Rollout Player: Opponent: | 3/Off 2/Off 85.88% (G: 38.80% B: 3.84%) 12.94% (G: 0.00% B: 0.00%) | +1.190 |
| 2. Rollout Player: Opponent: | 6/4 6/3 88.25% (G: 31.87% B: 2.62%) 11.75% (G: 0.00% B: 0.00%) | +1.153 (-0.038) |
| 3. Rollout Player: Opponent: | 5/Off 83.51% (G: 33.74% B: 2.96%) 16.49% (G: 0.00% B: 0.00%) | +1.067 (-0.124) |
Note that the play of 5/off is a blunder even though it guards against 6-6 leaving a shot. It is a myth that you want to be even on the top two points. The best distribution is 2-3-3-3-2 on the six thru two point.
Change the match score again, and change the position, and again distribution is the overriding factor.
(3) DMP. Blue to play 3-2
Black is on the point of crashing here, and you do not want to give him good fives, so taking two off leads to fractionally more wins, which is the crucial factor. Again clearing the five-point to “keep even” is wrong, but not as bad as when gammons count.
| 1. Rollout Player: Opponent: | 3/Off 2/Off 91.14% (G: 43.90% B: 10.35%) 8.86% (G: 0.00% B: 0.00%) | +0.823 |
| 2. Rollout Player: Opponent: | 6/4 6/3 91.00% (G: 36.99% B: 7.77%) 9.00% (G: 0.00% B: 0.00%) | +0.820 (-0.003) |
| 3. Rollout Player: Opponent: | 5/Off 88.85% (G: 39.11% B: 8.18%) 11.15% (G: 0.00% B: 0.00%) | +0.777 (-0.046) |
The decision will usually be very close between taking two off even when gammons don’t count. Taking two off wins slightly more games and gains a lot on Black’s fives.
Change the position again very slightly and the best play changes.
(4) DMP. Blue to play 3-2
Now it is right to clear the six-point, even though Black is on the verge of crashing.
| 1. Rollout Player: Opponent: | 6/4 6/3 90.24% (G: 37.65% B: 7.69%) 9.76% (G: 0.00% B: 0.00%) | +0.805 |
| 2. Rollout Player: Opponent: | 3/Off 2/Off 89.21% (G: 43.45% B: 10.88%) 10.79% (G: 0.00% B: 0.00%) | +0.784 (-0.021) |
| 3. Rollout Player: Opponent: | 5/Off 87.95% (G: 38.99% B: 8.31%) 12.05% (G: 0.00% B: 0.00%) | +0.759 (-0.046) |
What happens when gammons count for us?
(5) Black leads 3-1 in a 5-point match. Blue to play 3-2
Now clearing the six-point is a blunder. Even taking a checker off from the 5-point is better. If you clear, Black can run with fives as well as sixes and is more likely to save the gammon.
| 1. Rollout Player: Opponent: | 3/Off 2/Off 89.78% (G: 36.92% B: 8.52%) 10.22% (G: 0.00% B: 0.00%) | +1.534 |
| 2. Rollout Player: Opponent: | 5/Off 88.18% (G: 32.32% B: 6.83%) 11.82% (G: 0.00% B: 0.00%) | +1.410 (-0.124) |
| 3. Rollout Player: Opponent: | 6/4 6/3 90.75% (G: 29.50% B: 5.20%) 9.25% (G: 0.00% B: 0.00%) | +1.405 (-0.046) |
This position is included to show that the wrong play can be a blunder, and if you got this one wrong, you have probably missed the main point of the article!
In the next position, Blue does not need to win a gammon, so should make the play that leads to most wins.
(6) Blue leads 3-1 in a 5-point match. Blue to play 3-2
| 1. Rollout Player: Opponent: | 6/4 6/3 90.24% (G: 37.63% B: 7.69%) 9.76% (G: 0.00% B: 0.00%) | +0.805 |
| 2. Rollout Player: Opponent: | 3/Off 2/Off 89.21% (G: 43.41% B: 10.88%) 11.82% (G: 0.00% B: 0.00%) | +0.784 (-0.021) |
| 3. Rollout Player: Opponent: | 5/Off 87.95% (G: 38.98% B: 8.31%) 12.05% (G: 0.00% B: 0.00%) | +0.759 (-0.046) |
Although this seems a small difference, Black is only winning about 10% of the games, so an error which gives him 11% wins is quite a big one.
How do things change if the gammon is nailed on and there are even backgammons? Not a great deal. Distribution is still the most important factor. In the following position one would be reluctant to allow Black to jump with a five
(7) Money game. Blue to play 3-2
Now it is right to clear the six-point. It wins more games in total, and the extra gammons and backgammons from taking two off do not quite compensate.
| 1. Rollout Player: Opponent: | 6/4 6/3 81.72% (G: 61.86% B: 12.46%) 18.28% (G: 0.00% B: 0.00%) | +1.298 |
| 2. Rollout Player: Opponent: | 3/Off 2/Off 80.29% (G: 61.03% B: 14.38%) 19.71% (G: 0.00% B: 0.00%) | +1.272 (-0.026) |
| 3. Rollout Player: Opponent: | 5/Off 79.45% (G: 60.36% B: 12.32%) 20.55% (G: 0.00% B: 0.00%) | +1.224 (-0.074) |
(8) Money game. Blue to play 3-2
It transpires that the slightly better distribution now means that it is right to take 2 off.
| 1. Rollout Player: Opponent: | 3/Off 2/Off 82.47% (G: 62.90% B: 14.76%) 17.53% (G: 0.00% B: 0.00%) | +1.349 |
| 2. Rollout Player: Opponent: | 6/4 6/3 82.73% (G: 62.67% B: 12.67%) 17.27% (G: 0.00% B: 0.00%) | +1.333 (-0.017) |
| 3. Rollout Player: Opponent: | 5/Off 80.81% (G: 61.64% B: 12.87%) 19.19% (G: 0.00% B: 0.00%) | +1.277 (-0.072) |
One final position:
(9) Money game. Blue to play 3-2
Again it might be tempting to take two off, but that is an error, and it is correct to clear the six-point. If Black did not have a blot in board it would be even more important to clear the six-point.
| 1. Rollout Player: Opponent: | 6/4 6/3 82.35% (G: 63.09% B: 12.03%) 17.65% (G: 0.00% B: 0.00%) | +1.322 |
| 2. Rollout Player: Opponent: | 3/off 2/off 80.84% (G: 62.17% B: 14.13%) 19.16% (G: 0.00% B: 0.00%) | +1.297 (-0.025) |
What are the chances of Blue losing a backgammon with correct play?
Remarkably, it is possible for Blue to lose a backgammon with correct play here. The keen student will work out the odds of that happening . And the even keener student will work out why Blue cannot lose a backgammon in any of the other positions above, again with correct play.
For Blue to lose a backgammon, the following must happen. Blue needs to roll 5 consecutive sets of snake eyes, leaving a blot on the three-point. Black has to hit that, and then go on to win a backgammon. After Black hits there will be about 0.25% backgammons, and Black will correctly play on. So the chance of Black winning a backgammon is about (1/36)^5*11/36*0.25%. This works out to 0.0000000000126, so you would feel justified in having a whinge if you lost a backgammon here. The reason that a backgammon is not possible in the other positions is that the pip-count after the 3-2 needs to be 31 plus a multiple of four, otherwise Blue cannot blot on the three-point.
Damn it Paul! I thought I had this part of my game sussed. Ah well.
Thank you for this informative, yet difficult, bearoff quiz.
Wry instructive exercise. Thanks.